


The Ultimate Guide to Writing AI Image Prompts for Realistic Results
The world of digital art has experienced a massive shift. Today, anyone can sit in front of a screen, type a few words, and watch a machine render a breathtaking image in seconds. However, if you have ever tried using a text-to-image generator, you probably know that it is not always as simple as it looks. You type "a cat in space," expecting a cinematic masterpiece, but instead, you get a flat, cartoonish graphic that looks nothing like the vision in your head.
The secret to bridging this gap lies in a modern skill known as prompt engineering. AI models do not think like human artists; they rely on patterns, weights, and specific descriptive triggers. To get hyper-realistic, professional-grade images from your generator, you need to know exactly how to speak its language. This comprehensive guide will break down the exact structural formula you need to write flawless prompts every single time.
Why Your Current Prompts Are Falling Short
Most beginners make the mistake of writing prompts that are either too vague or too cluttered with empty buzzwords. Phrases like "photorealistic," "ultra-detailed," or "8K resolution" used to carry weight in early AI models, but modern generators largely ignore them.
Instead of demanding quality through generic adjectives, you must imply quality through specific technical terms. Think of the AI as a highly skilled photographer who needs instructions on camera gear, lighting setups, and environmental physics rather than just a simple command to "make it look real."
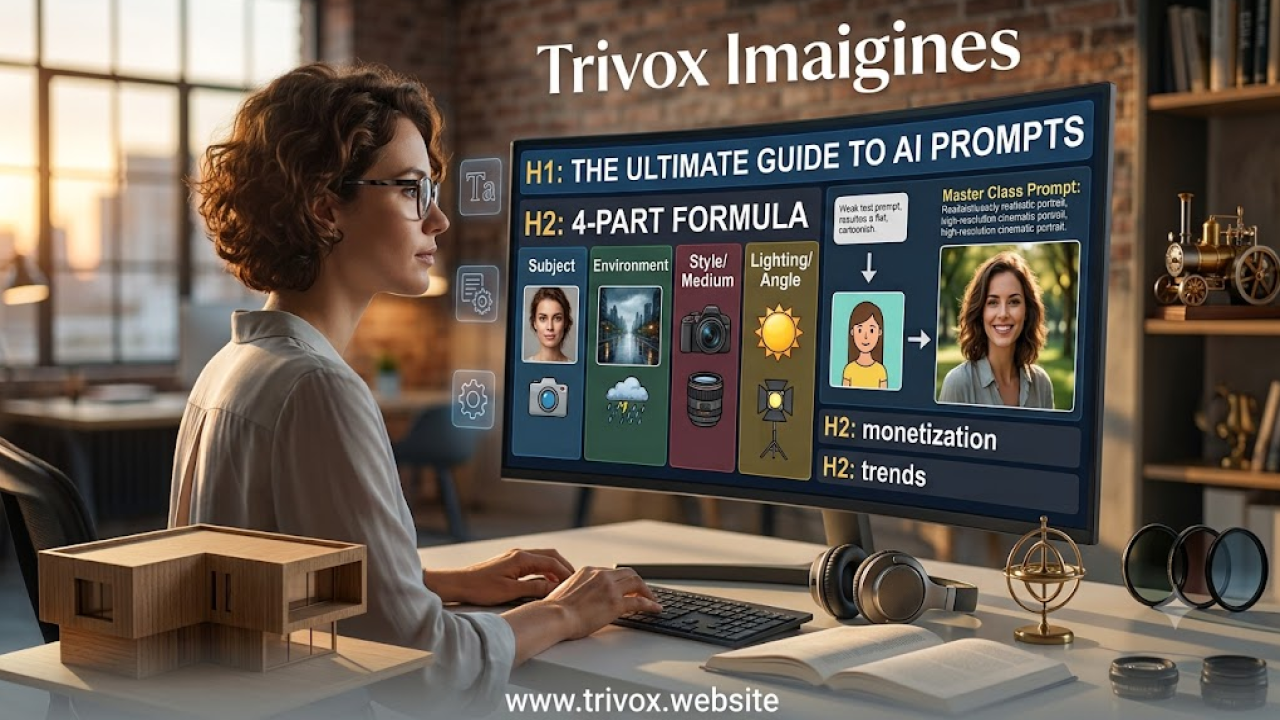
The 4-Part AI Prompt Architecture
To consistently generate highly realistic visuals, you should construct your text prompts using a modular formula. By breaking your thoughts down into four core pillars, you give the artificial intelligence a structured blueprint to follow.
1. The Core Subject (The "What")
Every great image starts with a clear, unambiguous subject. This is the absolute anchor of your prompt. Instead of just naming the subject, add immediate, concrete details about its state, action, or texture.
Vague Subject: A businessman.
Detailed Subject: A weathered 50-year-old businessman with subtle silver hair and visible fabric texture on his charcoal suit.
2. Environment and Background (The "Where")
The background sets the context and provides depth. Realistic images require a plausible relationship between the subject and its surroundings. You need to specify the atmosphere, the elements in the background, and how close or far they are.
Vague Environment: In the city.
Detailed Environment: Standing on a rain-slicked Tokyo street at night, with blurred neon signs reflecting off wet asphalt puddles in the background.
3. Artistic Style and Medium (The "How")
If you do not specify a medium, the AI will guess, often resulting in a semi-digital, plastic look. To achieve realism, you must explicitly tell the model to mimic real-world physical mediums, specifically traditional analog or modern digital photography.
Keywords to use: Portrait photography, documentary style, candid shot, architectural photography, macro lens capture.
4. Lighting and Camera Angles (The "Atmosphere")
Lighting is the single most important factor that separates an amateur AI generation from a professional one. It dictates shadows, skin textures, and color grading. Concurrently, specifying the camera lens adds realistic depth of field (the beautiful blur behind a subject).
Keywords for lighting: Volumetric golden hour sunlight, harsh studio rim lighting, moody Rembrandt lighting, soft diffused overcast light.
Keywords for camera gear: Shot on 35mm film, 85mm portrait lens, f/1.4 aperture, cinematic depth of field.
Putting the Formula into Practice: Real Examples
Let us look at how dramatically an image changes when we transform a simple sentence into a professionally structured, multi-part prompt using our formula.
Example Scenario A: Creating a Character Portrait
The Amateur Approach: A beautiful woman smiling outside.
The Professional Formula: A candid portrait of a woman with natural freckles smiling, warm golden hour sunlight illuminating her face from the side, shot on an 85mm lens, f/1.8 aperture, soft cinematic background blur of an autumn park.
Example Scenario B: Creating a Vehicle Scene
The Amateur Approach: A red sports car driving fast.
The Professional Formula: A commercial automotive photograph of a sleek red sports car speeding down a winding mountain highway, motion blur on the wheels, dramatic overhead overcast lighting, low-angle shot, sharp reflections on the metallic car body.
Advanced Techniques for Next-Level Realism
Once you master the basic four-part structure, you can introduce advanced modifiers to push the realism even further.
First, consider color grading. Specifying a color palette, such as "muted earthy tones," "high-contrast cinematic teal and orange," or "monochromatic black and white film style," prevents the AI from generating oversaturated, artificial colors.
Second, control the composition. Use filmmaking terms to tell the AI where to place the imaginary camera. Terms like "close-up shot," "wide-angle establishing shot," "eye-level perspective," or "extreme macro detail" give you complete control over the final framing of your image.
Frequently Asked Questions
What are negative prompts and how do they help with realism?
Negative prompts are words you provide to tell the AI what not to include in the image. To boost realism, adding terms like "deformed hands, extra limbs, mutated fingers, plastic skin, low resolution, cartoon, illustration" into the negative prompt section helps filter out common algorithmic errors.
Does writing a longer prompt always mean a better image?
Not necessarily. If a prompt is too long, the AI suffers from "prompt bleed," where it gets confused and starts blending words together or ignoring commands entirely. The goal is to be highly descriptive and concise, rather than just writing a long essay.
Conclusion
Mastering text-to-image generation is a blend of creative writing and technical understanding. By moving away from vague descriptions and adopting a structured, four-part formula focused on subjects, environments, photographic mediums, and specific lighting, you unlock the true power of modern AI art tools. Stop asking the machine to create something "realistic"—start describing the exact photographic elements that make reality look the way it does.


Comments (0)
No comments found